
Cloudflare Argo Tunnel Setup - Self-Host with a CG-NAT
Contents:
What is a Cloudflare Argo Tunnel
How it works
CG-NAT
Install
Setting up Cloudflare Repositories
Temporary Argo Tunnel
Permanent Argo Tunnel
Run in the background and on boot
Adding more services
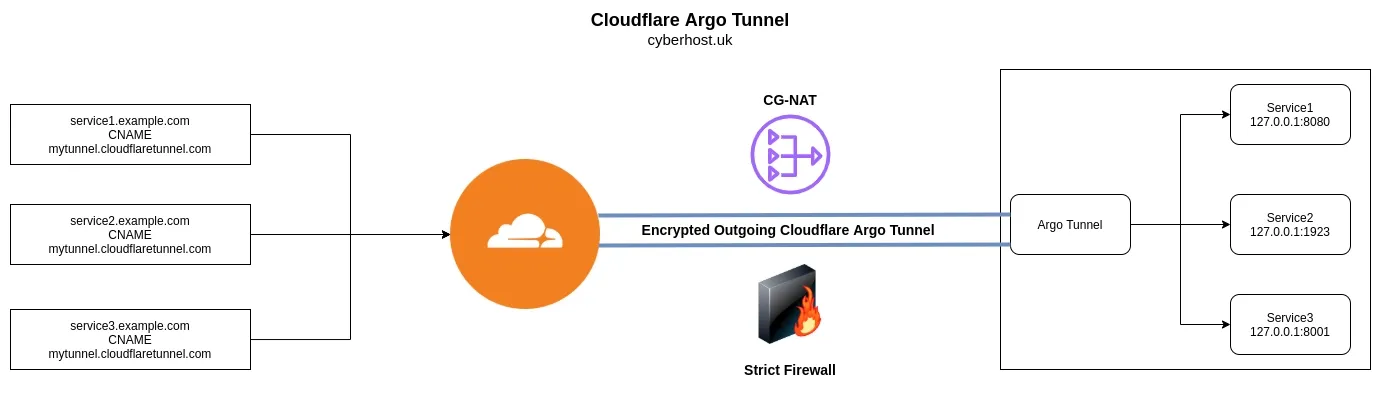
What is a Cloudflare Argo Tunnel?
Cloudflare Tunnel provides you with a secure way to connect your resources to Cloudflare without a publicly routable IP address. With Tunnel, you do not send traffic to an external IP — instead, a lightweight daemon in your infrastructure (cloudflared) creates outbound-only connections to Cloudflare’s edge. Cloudflare Tunnel can connect HTTP web servers, SSH servers, remote desktops, and other protocols safely to Cloudflare. This way, your origins can serve traffic through Cloudflare without being vulnerable to attacks that bypass Cloudflare. - Cloudflare
How it works
Cloudflared establishes outbound connections (tunnels) between your resources and the Cloudflare edge. Tunnels are persistent objects that route traffic to DNS records. Within the same tunnel, you can run as many cloudflared processes (connectors) as needed. These processes will establish connections to the Cloudflare edge and send traffic to the nearest Cloudflare data center. - Cloudflare
CG-NAT's
As the IPv4 address space has been exhausted, many ISP's have reduced their usage by implementing a CG-NAT, this is where multiple customers share the same IPv4 address. This basically makes port-forwarding impossible.
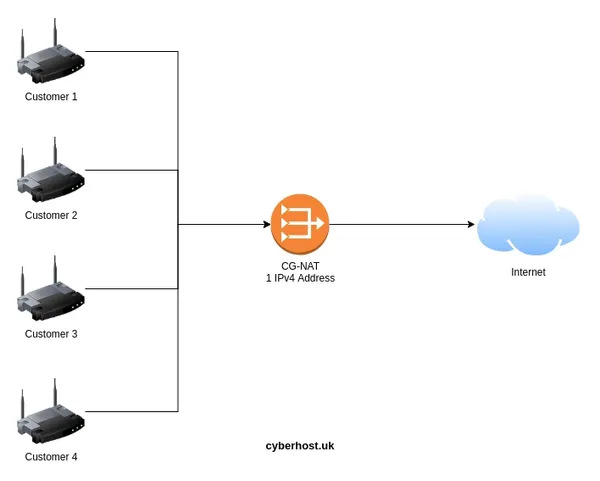
Using a Cloudflare Argo Tunnel removes the need to port forward, allowing users to self-host behind a CG-NAT, strict firewall or any ISP limitation.
Install
Setup Cloudflare Repositories
You can download the cloudflared binary from Cloudflare. I feel that setting up Cloudflare Repositories is a better solution as it can then be managed and updated via your package manager.
Follow the Official Setup Docs for your distribution.
Example setup for Debian 12 (Bookworm):
# Add cloudflare gpg key
sudo mkdir -p --mode=0755 /usr/share/keyrings
curl -fsSL https://pkg.cloudflare.com/cloudflare-main.gpg | sudo tee /usr/share/keyrings/cloudflare-main.gpg >/dev/null

# Add this repo to your apt repositories
echo 'deb [signed-by=/usr/share/keyrings/cloudflare-main.gpg] https://pkg.cloudflare.com/cloudflared bookworm main' | sudo tee /etc/apt/sources.list.d/cloudflared.list

# install cloudflared
sudo apt-get update && sudo apt-get install cloudflared
Temporary Argo Tunnel (Cloudflare account not required!)
Run: cloudflared tunnel --url localhost:<PORT>
Example: cloudflared tunnel --url localhost:80
Output:
+--------------------------------------------------------------------------------------------+
2021-10-14T21:01:42Z INF |  Your quick Tunnel has been created! Visit it at (it may take some time to be reachable):  |
2021-10-14T21:01:42Z INF |  https://bloomberg-car-giant-removed.trycloudflare.com                               |
2021-10-14T21:01:42Z INF +--------------------------------------------------------------------------------------------+
Just head to the URL outputted: https://bloomberg-car-giant-removed.trycloudflare.com.
It's that simple!
It's worth nothing there is some undocumented rate limiting that occurs on the this temporary setup, although you won't realise for dev project which it's designed for.
Permanent Argo Tunnel
-
Login:
cloudflared tunnel login -
Copy the URL and open in your browser
-
Create a new tunnel:
cloudflared tunnel create cyberhost
This can be viewed by running cloudflared tunnel list
ID                                   NAME      CREATED              CONNECTIONS
28c78ae-9ba2-40cc-c187-1892be52da8b cyberhost 2021-10-14T12:10:05Z
-
Navigate to
.cloudflaredyou may find this in your home directorycd ~/.cloudflared. -
Create a configuration file within the
.cloudflareddirectory:
nano config.yml -
Use the following config:
tunnel: <Tunnel-UUID>
credentials-file: <PATH>/.cloudflared/<Tunnel-UUID>.json

ingress:
  - hostname: demo.example.com
    service: http://localhost:80
  - service: http_status:404
Replace <PORT>, <Tunnel-UUID>, <PATH> and demo.example.com. To find <PATH> run pwd in the .cloudflared directory.
-
Connect the Argo tunnel with a hostname
eg:cloudflared tunnel route dns <UUID or NAME> demo.example.com -
Now run the tunnel
cloudflared tunnel run <UUID or NAME>
Run in the background and on boot
-
Create a system service:
sudo cloudflared --config ~/.cloudflared/config.yml service install -
Start and enable service at boot:
sudo systemctl start cloudflared && sudo systemctl enable cloudflared
Adding more services
-
Pair another hostname:
cloudflared tunnel route dns <UUID or NAME> demo2.example.com -
Add another ingress point to the config:
ingress:
  - hostname: demo.example.com
    service: http://localhost:80
  - hostname: demo2.example.com
    service: http://localhost:8080
  - service: http_status:404
- Remove the existing service config
sudo rm /etc/cloudflared/config.yml - Install the new config:
sudo cloudflared --config ~/.cloudflared/config.yml service install - Restart service:
sudo systemctl restart cloudflared